I saw this in "Art of Manliness", I use blades as part of my job and when I do my Boy Scout stuff. This article is a really good article with a lot of good information in it for us "Woodsy" folks.
Your belt knife is your main tool for bushcrafting and as such it really must be multifunctional in nature in and of itself. A knife that is too small will not be good for processing firewood if needed, and a knife that is too big will not be good for fine carving and shaping wood. One would hope to have multiple tools at any given time and, in this case, one can really refine the belt knife to a certain set of criteria, one that is more suited to the finer tasks; an axe and saw will do the heavy work. This may not always be the case and may not always be feasible, so it is best to stay in the 4″–5″ range with a full tang and a carbon steel blade. This will give your knife maximum versatility.
You should be able to accomplish five main tasks with your belt knife:
- Creating fire lay materials
- Starting a fire
- Cutting saplings
- Felling a tree
- Creating notches
That said, many knife-craft skills are important, and many overlap each other in some way. Therefore, the items on this list of skills are the ones I believe to have the most direct effect in an emergency if you are left with only having your trusty belt knife as a tool. To that end fire and shelter will be more important to you than most other things, so the skills you must initially own are based on this premise.
1. Creating Fire Lay Materials
You’ll use your knife to create fire lay materials. There are three elements of any fire lay: tinder, kindling, and fuel. With this in mind you have to look at how your knife can be used to process all three effectively and safely, while still bearing in mind the tool itself is a resource to be conserved as much as possible.
The number one rule in our conservation theory is don’t use your knife unless you have to. Look for wood of the correct size to create kindling and fuel that is just lying about the forest floor.
Now of course many times the best things will either not be available or be in an unusable condition when we need them most, so you will need to use your knife. For creating tinder materials you want to find inner barks of trees like cedar or poplar if possible. These will be highly combustible and can be worked by hand once harvested to create the bird’s nest or tinder bundle.
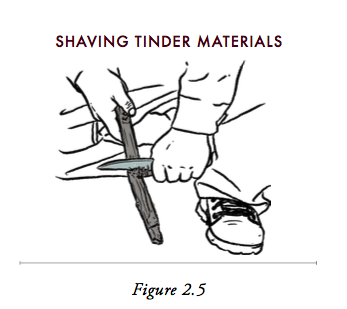
You want to avoid as much as possible using the blade of your knife for this process and so a 90-degree sharp spine—which means the spine is squared off to be sharp on the corners, not unlike a cabinet scraper—becomes a sure bonus for your sheath knife. You can also use this 90-degree spine to shave smaller stick materials like fatwood and softer species to create fine shavings that can be used as kindling and have less effect on the knife by conserving the blade edge as well. See FIGURE 2.5 for an example of using a knife to shave tinder.
For kindling material and fuel wood we may need to baton, or strike the back of the tool or knife with a wooden mallet or baton for processing, the blade of our knife to split material along the grain to reduce the diameter as well as possibly baton across the grain to reduce the length if we cannot simply break it by hand or use the fork of a tree for leverage to snap the length. See FIGURE 2.6 for an example of batoning with a knife.
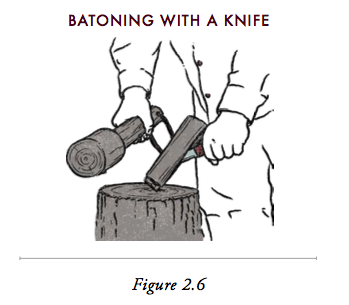
Batoning is an indispensable skill if you are ever left with only a knife to process wood. First, try to use material that is free of knots and small in diameter, and if possible, do not use a knife without a full tang. When you need to baton to split the grain, keep impact blows in the center of the blade and centered in the material. Once you have initially split the grain, you should be able to place a wooden wedge of material in the split and baton that to complete the task.
A good rule of thumb for splitting is to never split a log that is so large it will not allow at least an inch of the side of the blade to protrude from the split once the knife disappears into the split. If you have to strike the knife again, strike the tip, never the handle. Have some sort of anvil under the material in case the knife goes cleanly through a split. This prevents the blade from striking the ground, causing potential damage.
2. Starting a Fire
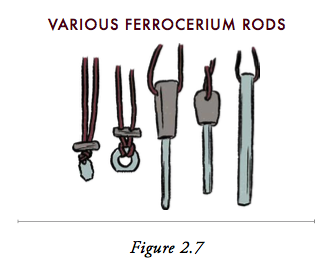
Your knife is an important part of your re-starting capability when it comes to combustion. You can use its spine to strike a ferrocerium rod, which is a mixed metal rod containing pyrophoric elements like iron and magnesium that produce hot sparks when materials are quickly scraped from the rod with a sharp object harder than the rod. It is also possible to use your knife as a steel for flint-and-steel ignition (provided you are using a high-carbon steel blade). See FIGURE 2.7 for examples of ferrocerium rods.
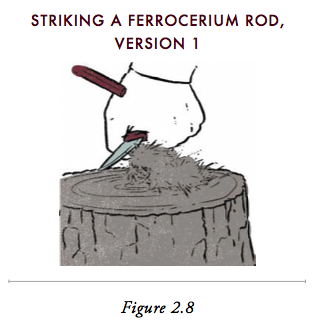
Using the back 90-degree spine of the knife to strike a ferrocerium rod accomplishes several important and often overlooked things. First, it means you do not have to worry about carrying a separate striker, most of which are inadequate for the task anyway. You can get much better leverage on your knife to strike the rod.
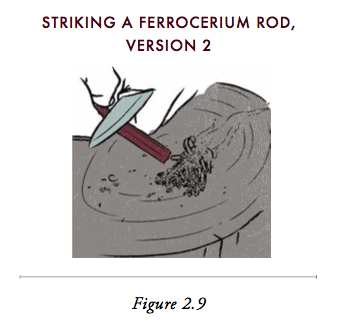
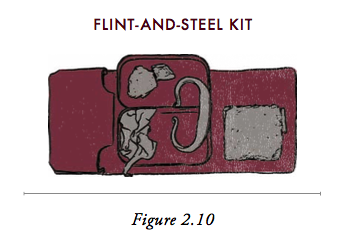
The true function of the ferrocerium rod is to be used as an emergency ignition tool, so you want the maximum amount of material to be removed from the rod with a single strike (this is the reason I believe a soft, large rod is better than a smaller or harder rod of this type). You can bring maximum power and maximize the surface area being pushed against the rod with a knife blade. See FIGURES 2.8 AND 2.9 for examples of striking a ferrocerium rod. For an example of a flint-and-steel kit, see FIGURE 2.10.
3. Cutting Saplings
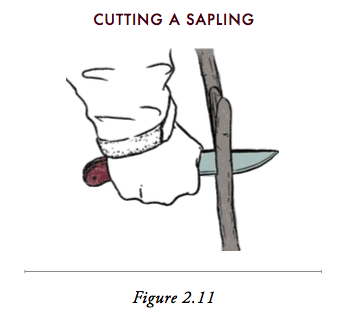
Cutting saplings becomes necessary for shelter building as green wood may be preferable. The flexibility of green wood has distinct advantages when making dome-type structures. Cutting a sapling is as easy as taking advantage of the tree’s own weaknesses. Bend the sapling over, stressing the fibers, and cut into them at an angle toward the root ball. See FIGURE 2.11 for an example.
4. Felling a Tree
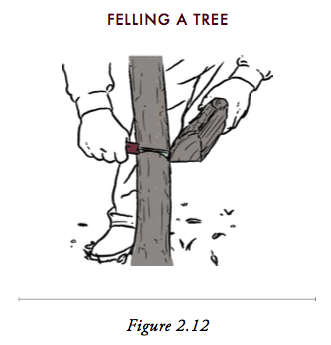
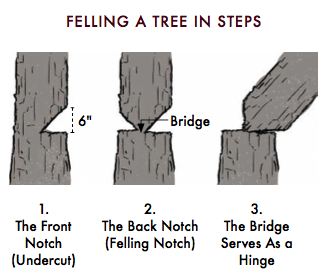
When we talk about felling a tree with a knife we are obviously not felling a fifty-year-old tree that would require an axe or axe/saw combination. Rather we’re talking about felling trees of more manageable sizes, typically up to 4″–5″ in diameter that, unlike saplings, are not able to just be bent over and shear cut. For this discussion of what boils down to emergency knife use, you only need to harvest material that is large enough in diameter to be structural or good fuel. This technique is also known as beaver chewing, where you will baton your blade, creating a V notch around the tree, steadily reducing the diameter until you can push the tree over for further use or processing. See FIGURES 2.12 AND 2.13 for examples of felling a tree.
5. Creating Notches
Notching of material is used for everything from building a structure to manipulating a pot over fire to creating trap components. Think about the Lincoln Logs you may have had as a youngster. The simple notches are what held everything together without the use of cordage or other fasteners. You may combine cord with a notch to better bind them but the notch makes interlocking of wood components possible.
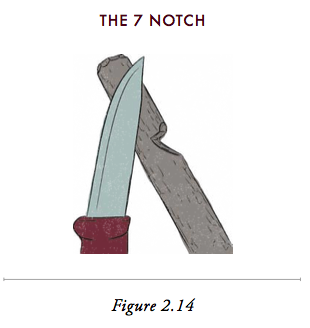
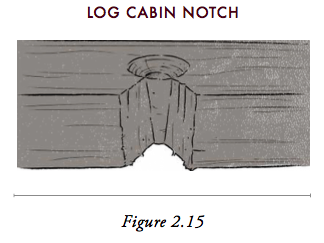
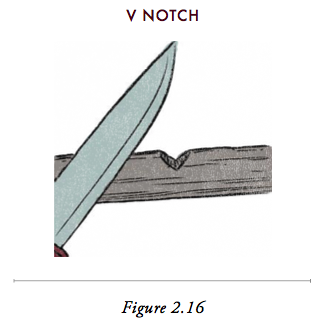
In my mind the most important yet rudimentary notches are the 7 notch, the log cabin notch, and the V notch. With these three simple notches many other things can be constructed. See FIGURES 2.14 THROUGH 2.16 for examples.
_______________________________________

Brings back a LOT of Boy Scout training! :-)
ReplyDeleteReally great instructions on how to destroy a knife...... If you're going to "baton" a thick piece of wood you should just throw your knife away. People will say "Well, a knife is all I have" - then you won't have it for very long.
ReplyDelete