I saw this from "American Rifleman". I owned several "Mauser action rifle, a 98K Riflemen Yugoslavia and an 03A3 from The United States. Unfortunately both have been lost on kayak Accidents...Most regrettable *Sniff*Sniff*. The Mauser action has defined bolt action rifle actions for over a century and we loved the rifle after facing it in the Spanish American War, it was far superior to the "Krag-Jorgensen" and "Trapdoor" Springfield we had, we don despite the Spaniards having a better rifle. We quickly developed our own rifle the "M1903 Springfield".

Few rifles have influenced firearm design and military history as much as the Mauser 98. Adopted by the German army in 1898 to replace the 1888 “Commission” rifle, the Mauser Gewehr 98 and derivatives became among the most widely produced and distributed rifles of all time. The Model 98 still represents the benchmark in bolt-action design owing to its simplicity, strength and safety, and its basic format was the starting point for most significant commercial bolt-actions that followed.
The standard “large-ring” Model 98 mechanism locks up by way of two main, horizontally opposed, lugs at the bolt body’s front that engage mating recesses in the receiver ring. A third, smaller “safety” lug at the bolt’s rear protects the shooter in the event of a catastrophic failure. A large, non-rotating claw extractor and blade-style ejector impart the “controlled-round feed” of cartridges that soldiers and sportsmen have come to value because it all but guarantees proper functioning, even in the most adverse conditions. The extractor engages the rim of a cartridge as it rises upward from the magazine and maintains control as the cartridge is pushed into the chamber and, upon opening and withdrawing the bolt, as an unfired cartridge or empty case is extracted and ejected.
Lock time of the Model 98 was improved compared to previous Mauser designs, and Mauser incorporated additional safety features—large ports in the bolt body and a flanged bolt sleeve—to direct errant propellant gases away from the shooter in the event of a pierced primer or catastrophic case failure. A three-position safety at the rear of the cocking piece allowed the bolt to be locked or unlocked while on safe. The rifle-length Gewehr 98 remained the service rifle of the German Wehrmacht until 1935, when it was replaced by the shorter Karabiner 98k. Millions of Mauser 98-pattern rifles and derivatives have been produced since its introduction in the late 19th century, and it remains a popular military arm with collectors.
Today, commercial Model 98 actions are the basis for some of the world’s finest sporting rifles. 
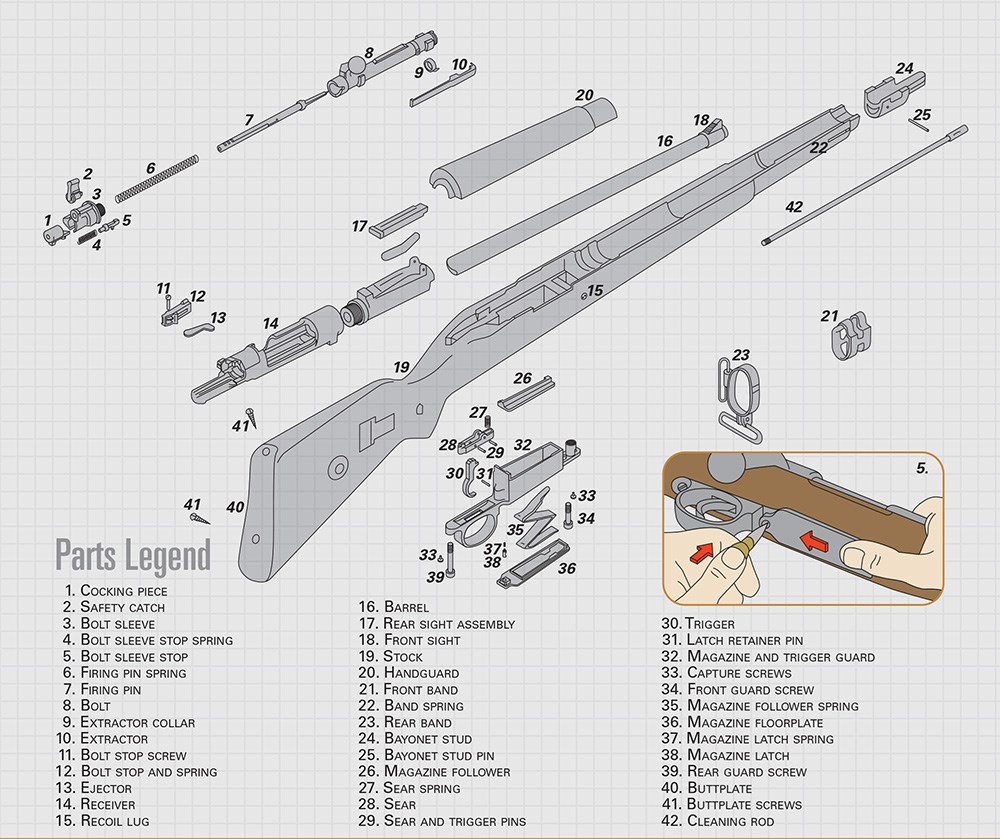
click here for enlargement
Disassembly Instructions
 To
take down the Mauser, lift the handle of the bolt (8) and pull it back
to ensure the chamber is empty. Close it, depressing the magazine
follower (26), if necessary, and turn the safety catch (2) to the
vertical position. Open the bolt again, and pull it back until it stops.
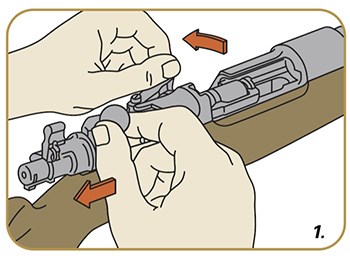
Next, pull the forward edge of the bolt stop (12) out as far as it can
go (Fig. 1) while withdrawing the bolt assembly from the rifle.
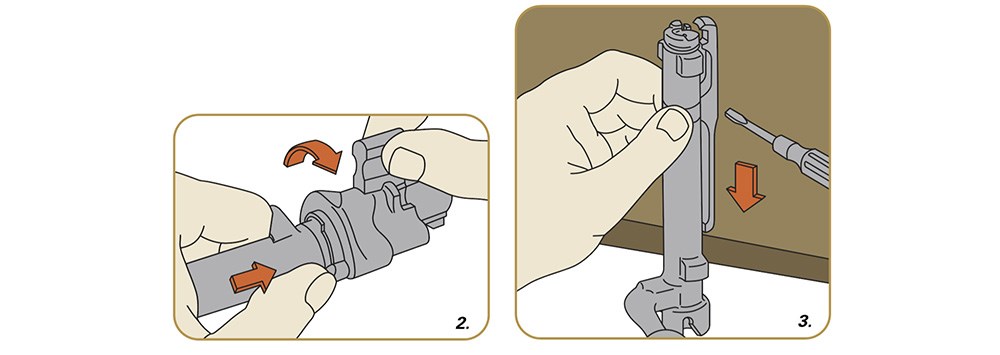
To remove the bolt sleeve and firing pin assembly (1-7), push the bolt sleeve stop (5) in as shown. When the stop pin is pushed in far enough, unscrew the cocking piece (1) from the bolt (Fig. 2), pressing the stop pin again as necessary to get it past the root of the bolt handle.
To remove the extractor (10), turn the extractor until its edge is opposite the ejector cut in the bolt face. Then, using a screwdriver, pry the front end of the extractor up and out of its groove in the bolt. Revolve it a bit farther until it is in-between the locking lugs. Tap the back end of the extractor on the bench edge as shown (Fig. 3). The extractor will snap free, exposing the extractor collar (9). Do not remove the extractor collar unless necessary.

To
disassemble the rest of the bolt, first place the point of the firing
pin against a soft block of wood to prevent it from getting damaged.
Late-World War I Gewehr 98 and Karabiner 98k rifles,
as well as a few other variants, have a hole in the stock to facilitate
this stage of disassembly. For compatible rifles, place the firing-pin
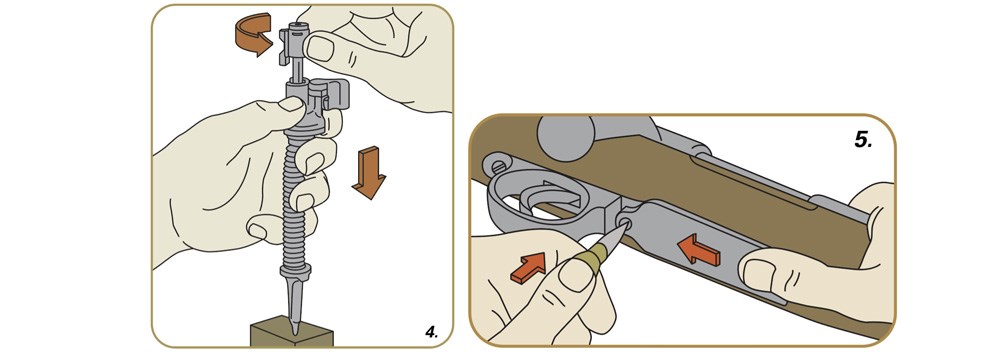
end of the bolt into the disassembly hole. Next, grasp the bolt sleeve
as shown and press down hard until the cocking piece is clear of the
bolt sleeve (3). Turn the cocking piece one-quarter turn as shown and
lift it off (Fig. 4). Ease up on the pressure and
remove the bolt sleeve and firing pin spring (6). Perform this operation
away from your face while wearing safety glasses, as the firing pin
spring is under considerable compression.
This concludes the fieldstripping procedure for most Mauser 98-type rifle actions. Further disassembly is not required or recommended for basic maintenance. For those who wish to go further, the following steps will guide owners through complete disassembly.

Depress
the magazine latch (38) with a blunt tool, such as the tip of a bullet,
and press the floorplate (36) rearward to release it (Fig. 5)
along with the magazine follower spring (35) and follower (26). Unscrew
the rifle’s cleaning rod (42) and remove it from its channel on the
underside of the stock. Depress the band spring (22) until its detent
clears the corresponding hole on the front band (21). Slide the front
band toward the muzzle until it clears the stock. Remove the band spring
and slide the rear band (23) off. Remove the handguard (20).
Using a flat, hollow-ground screwdriver, loosen and remove the capture screws (33) at the front and rear of the magazine and trigger guard (32), if they exist. Remove the front and rear guard screws (34, 39), and pull the magazine and trigger guard from the stock. You can now remove the barreled action from the stock. Removal of the buttplate (40) is not recommended unless absolutely necessary, as continual removal and re-insertion of the buttplate screws can damage their respective holes within the stock. Reassembly is accomplished in the reverse order.
No comments:
Post a Comment
I had to change the comment format on this blog due to spammers, I will open it back up again in a bit.