I shamelessly clipped this from "American Rifleman". In honor of my poor departed Garand that I lost in that durn kayak accident *Sniff*Sniff*, Those Kayaks should be registered as "Lethal Weapons". for the havoc they cause to the gun owning community.

A History of the M1 Garand
During World War I, the United States Army experimented with a number of different machine gun designs, and the news reports of the tests got a young inventor thinking about, and eventually designing, a machine gun of his own. His initial attempt was a primer-actuated light machine gun he submitted to the National Bureau of Standards, which had instructed him to make a model of it. That design became the basis for what would, eventually, become the M1 rifle—commonly called the “Garand” after its inventor, John Cantius Garand.
Garand, who became a Springfield Armory employee in 1919, had an extensive background in design and production. Once at Springfield, he was tasked with designing a semi-automatic shoulder rifle based upon his earlier machine gun. He worked on and improved the design for the next 17 years. The now-familiar M1 was finally adopted on January 9, 1936, the rifle was adopted as the “U.S. Rifle, Cal. .30, M1.”
Early production rifles used a “gas trap” instead of the later “gas port” design and initially did not perform as well as expected, but once the “bugs” were worked out, the rifle was favorably received. It was fed by an eight-round en-bloc clip that was ejected along with the last spent casing, locking the bolt back and leaving the receiver open for a fresh clip to be inserted. User-friendly, accurate and chambered for the powerful .30-’06 Sprg. cartridge, the M1 gained a reputation as a hardy and well-made service rifle.
World War II was the rifle’s baptism of fire, and it performed admirably. To a man, the G.I.s put their faith in their M1 rifles and took them from North Africa to Okinawa. Along the way, Garand made more improvements to the rifle based upon field experience and soldiers’ comments.
Although late to adopt the rifle, the Marines liked it, too, and found it well-suited for jungle fighting. America was the only country to equip its fighting men with a semi-automatic rifle as a standard shoulder arm. The venerability of the rifle was further established in the Korean War.
The M1 rifle is not without faults. At just under 10 lbs. it is heavy and the en-bloc clip does not allow for easy “topping off.” Because of those drawbacks, America sought a high-capacity, fully automatic rifle for individual soldiers. Reliability and accuracy were paramount, however, and the M1 was the measuring stick. What later became the M14 was based upon the M1.
Combined, Springfield Armory and Winchester Repeating Arms manufactured more than 4 million M1s during World War II. International Harvester and Harrington & Richardson manufactured them as well, and, during the Korean War, more than 500,000 were made.
The rifle is considered one of the finest ever produced by American armories. Its popularity is evidenced by its representation on the firing line at Camp Perry and other highpower rifle matches to this day. It is accurate, robust and its service record speaks for itself.
Disassembly
Disassembly of the unloaded M1 rifle begins by pulling the bolt rearward until it locks back. Visually inspect the chamber to ensure it is not loaded, then press down on the slide and follower while holding the operating rod and ease the bolt forward. Do this carefully or you will end up with a case of “M1 thumb”—a highly unpleasant condition!
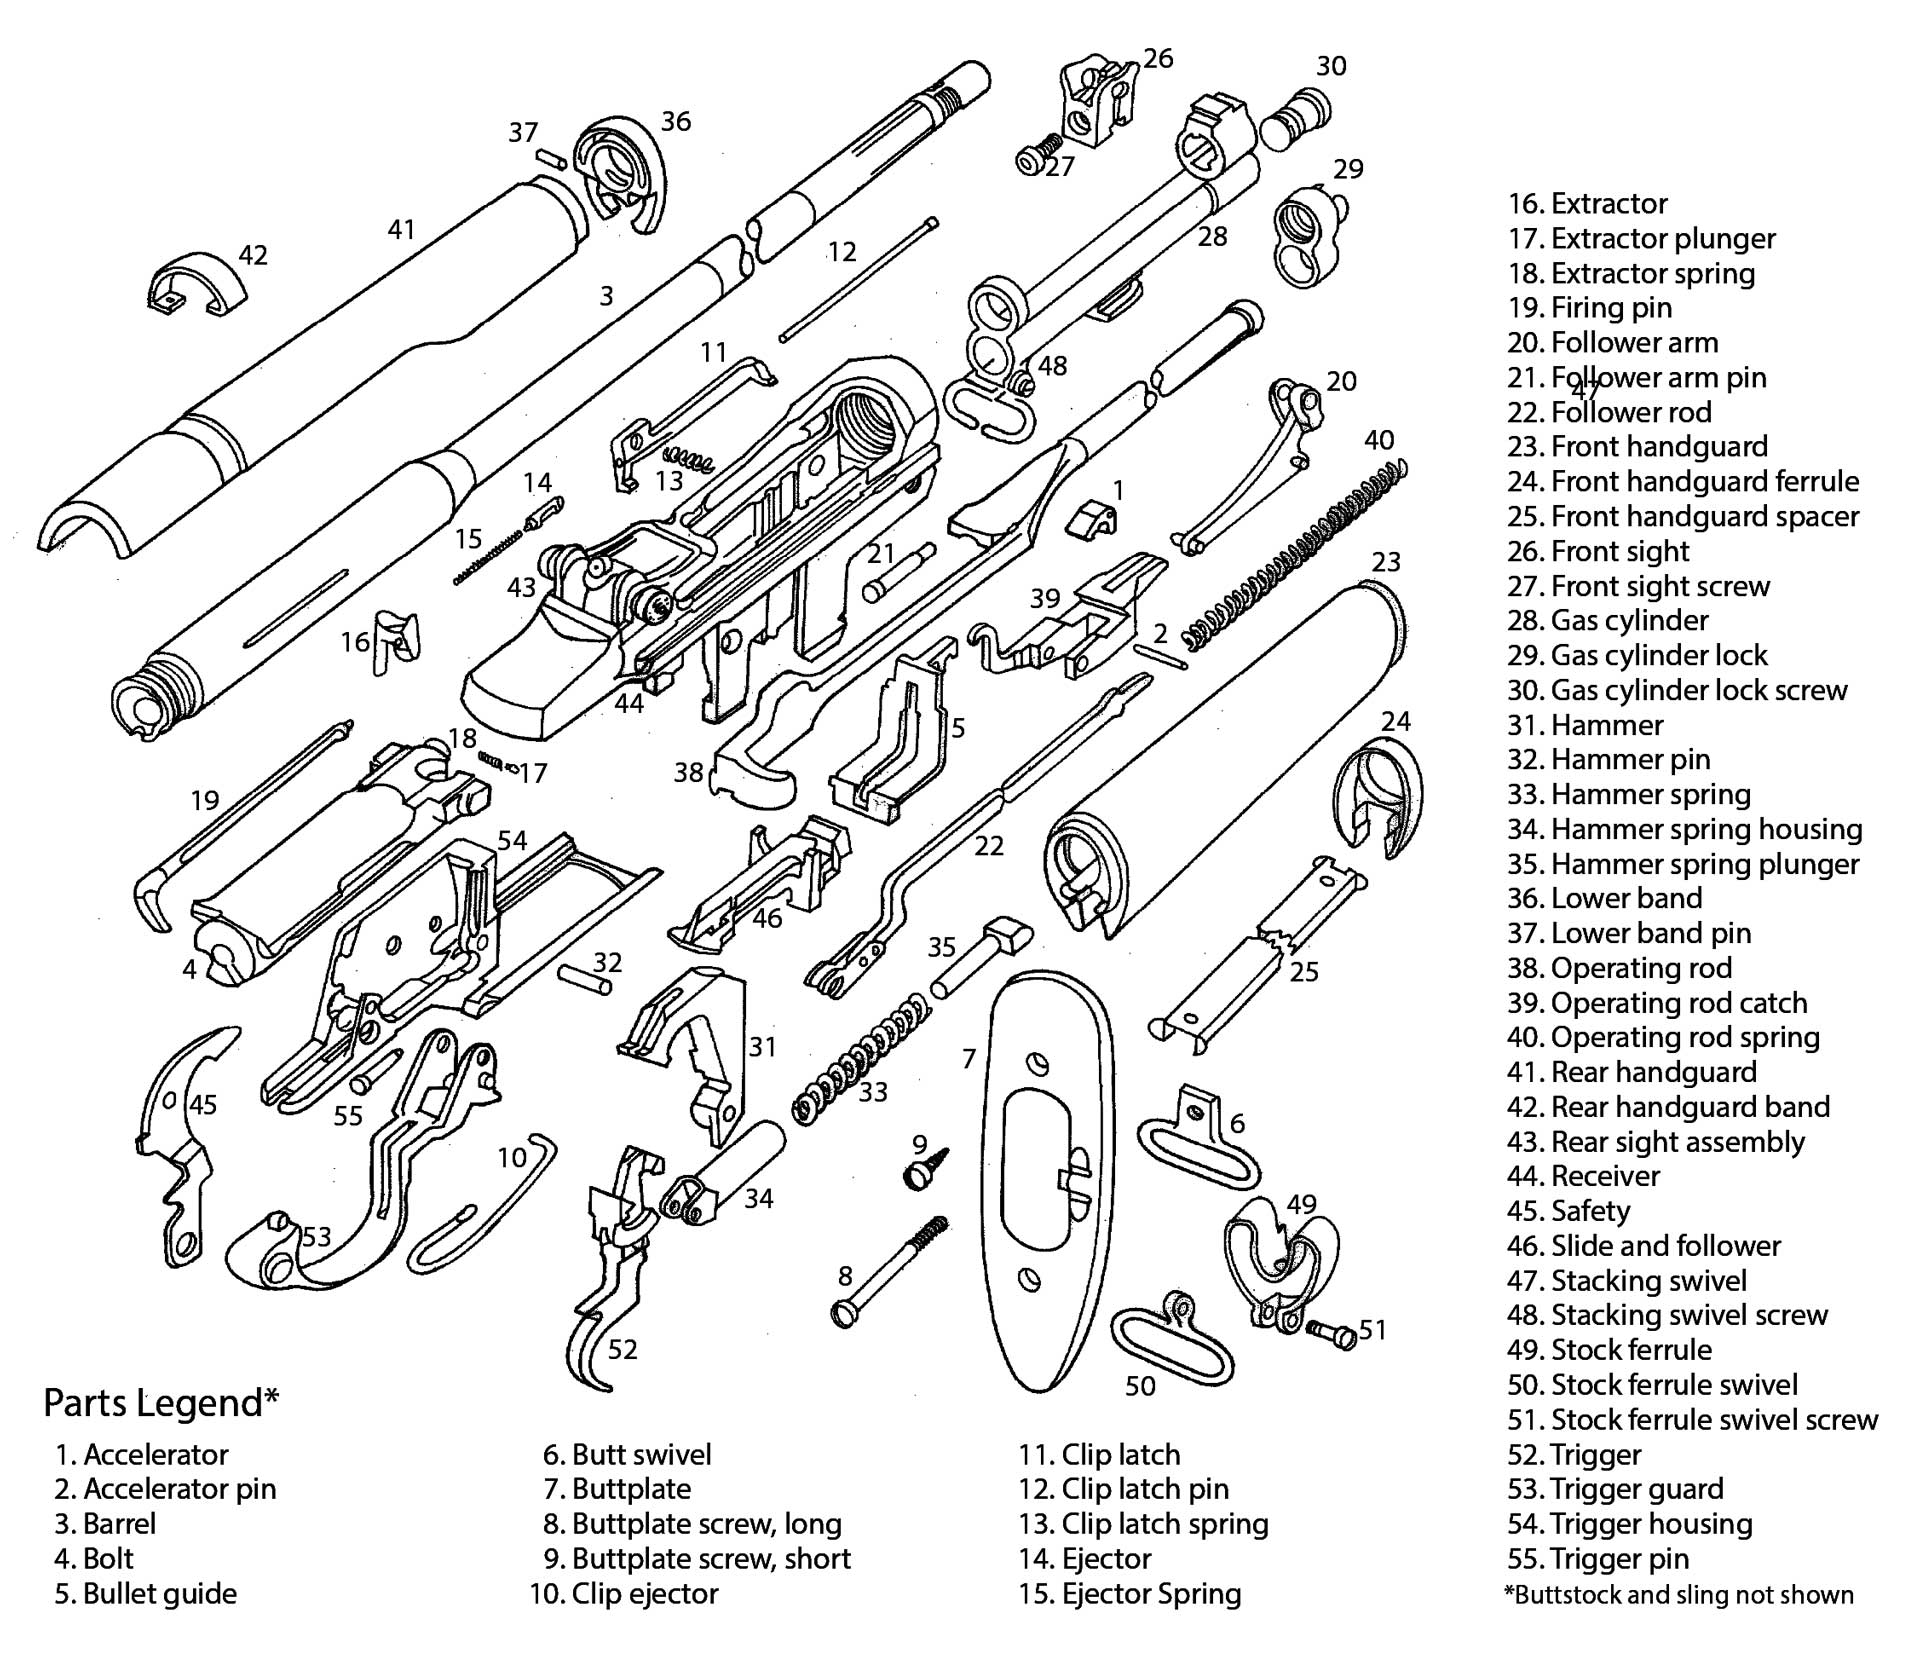
Once this is done, disassembly can begin. Pull rearward on the trigger guard (53) and then out and away from the stock. The entire trigger housing (54) and assembly will separate from the rifle (Fig. 1). Lift the receiver (44) and assembly away from the stock.
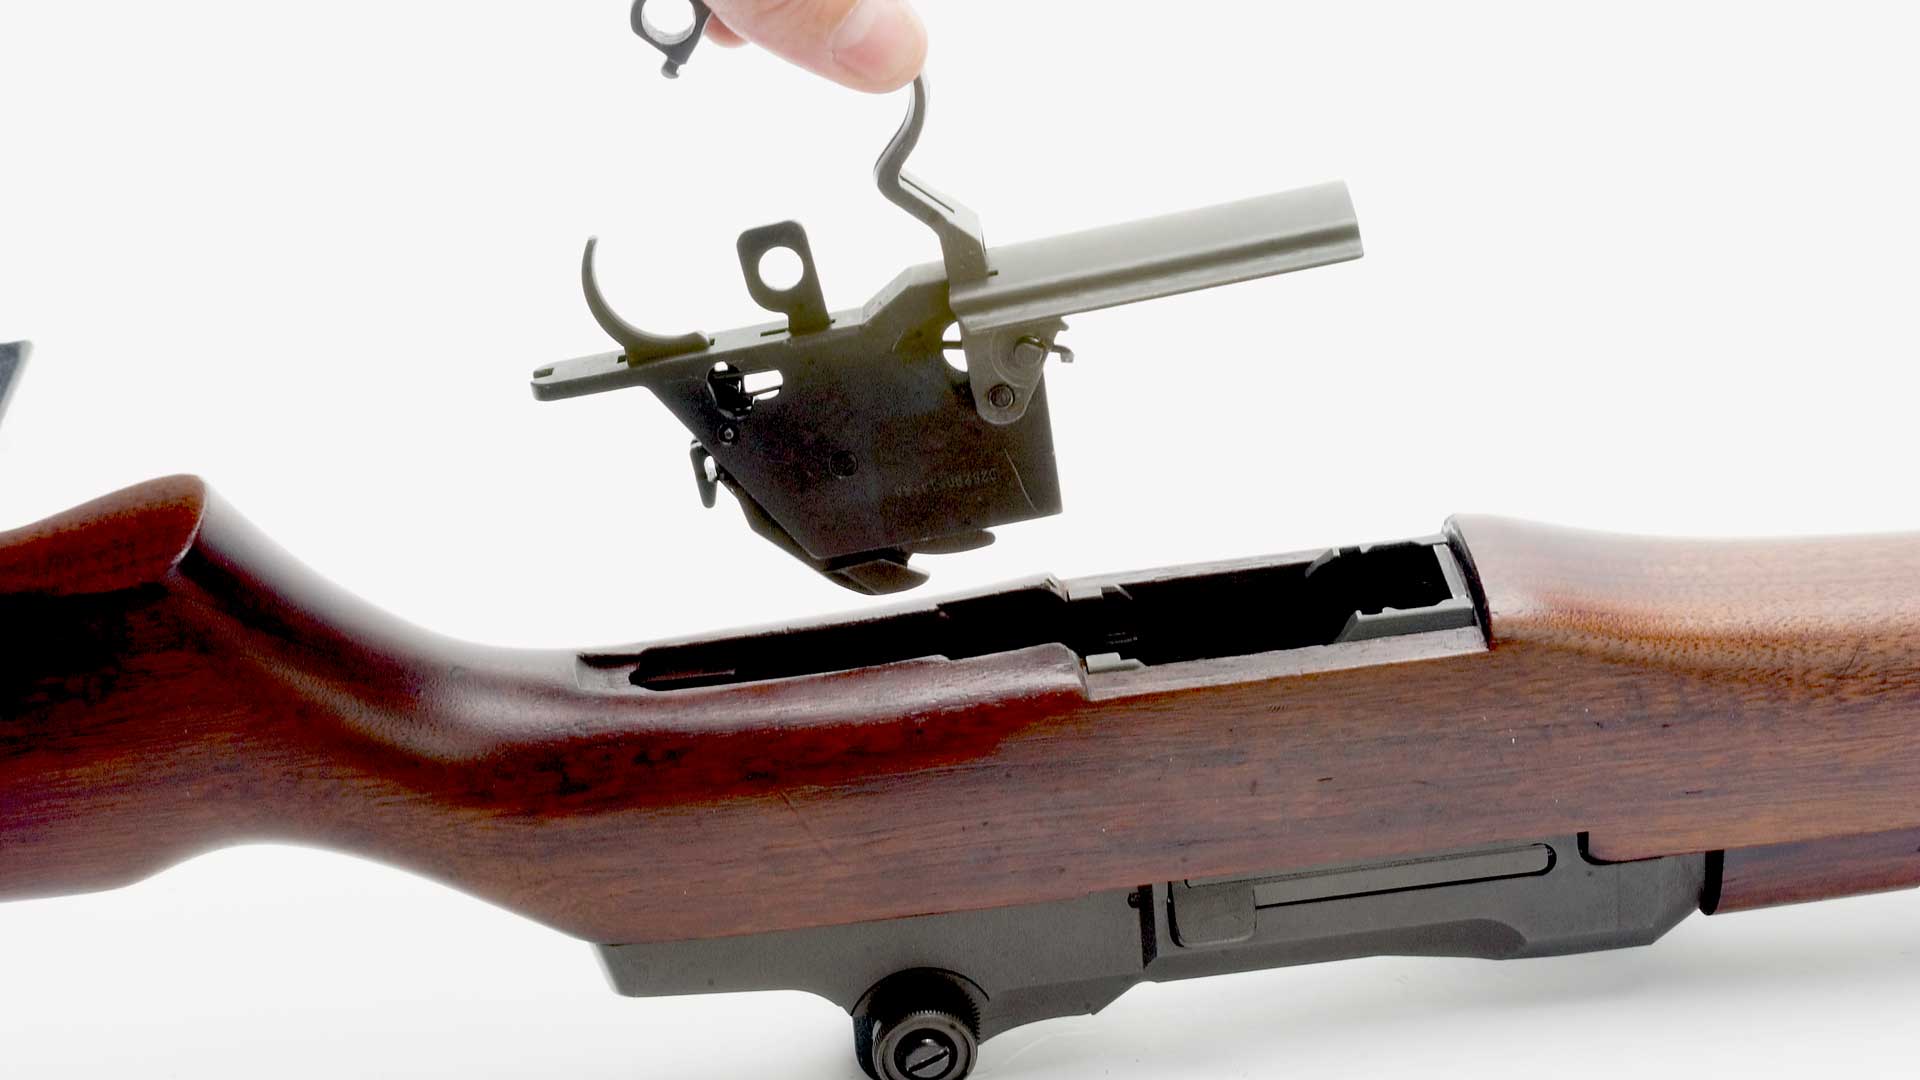
Disengage the follower rod (22) from the follower arm (20) by moving the rod toward the muzzle. Remove the rod and operating rod spring (40). Next, push out the follower arm pin (21) from the receiver’s left side. Then lift away the bullet guide (5),
follower arm and operating rod catch (39) (Fig. 2). Reach down into the receiver and lift out the slide and follower (46).
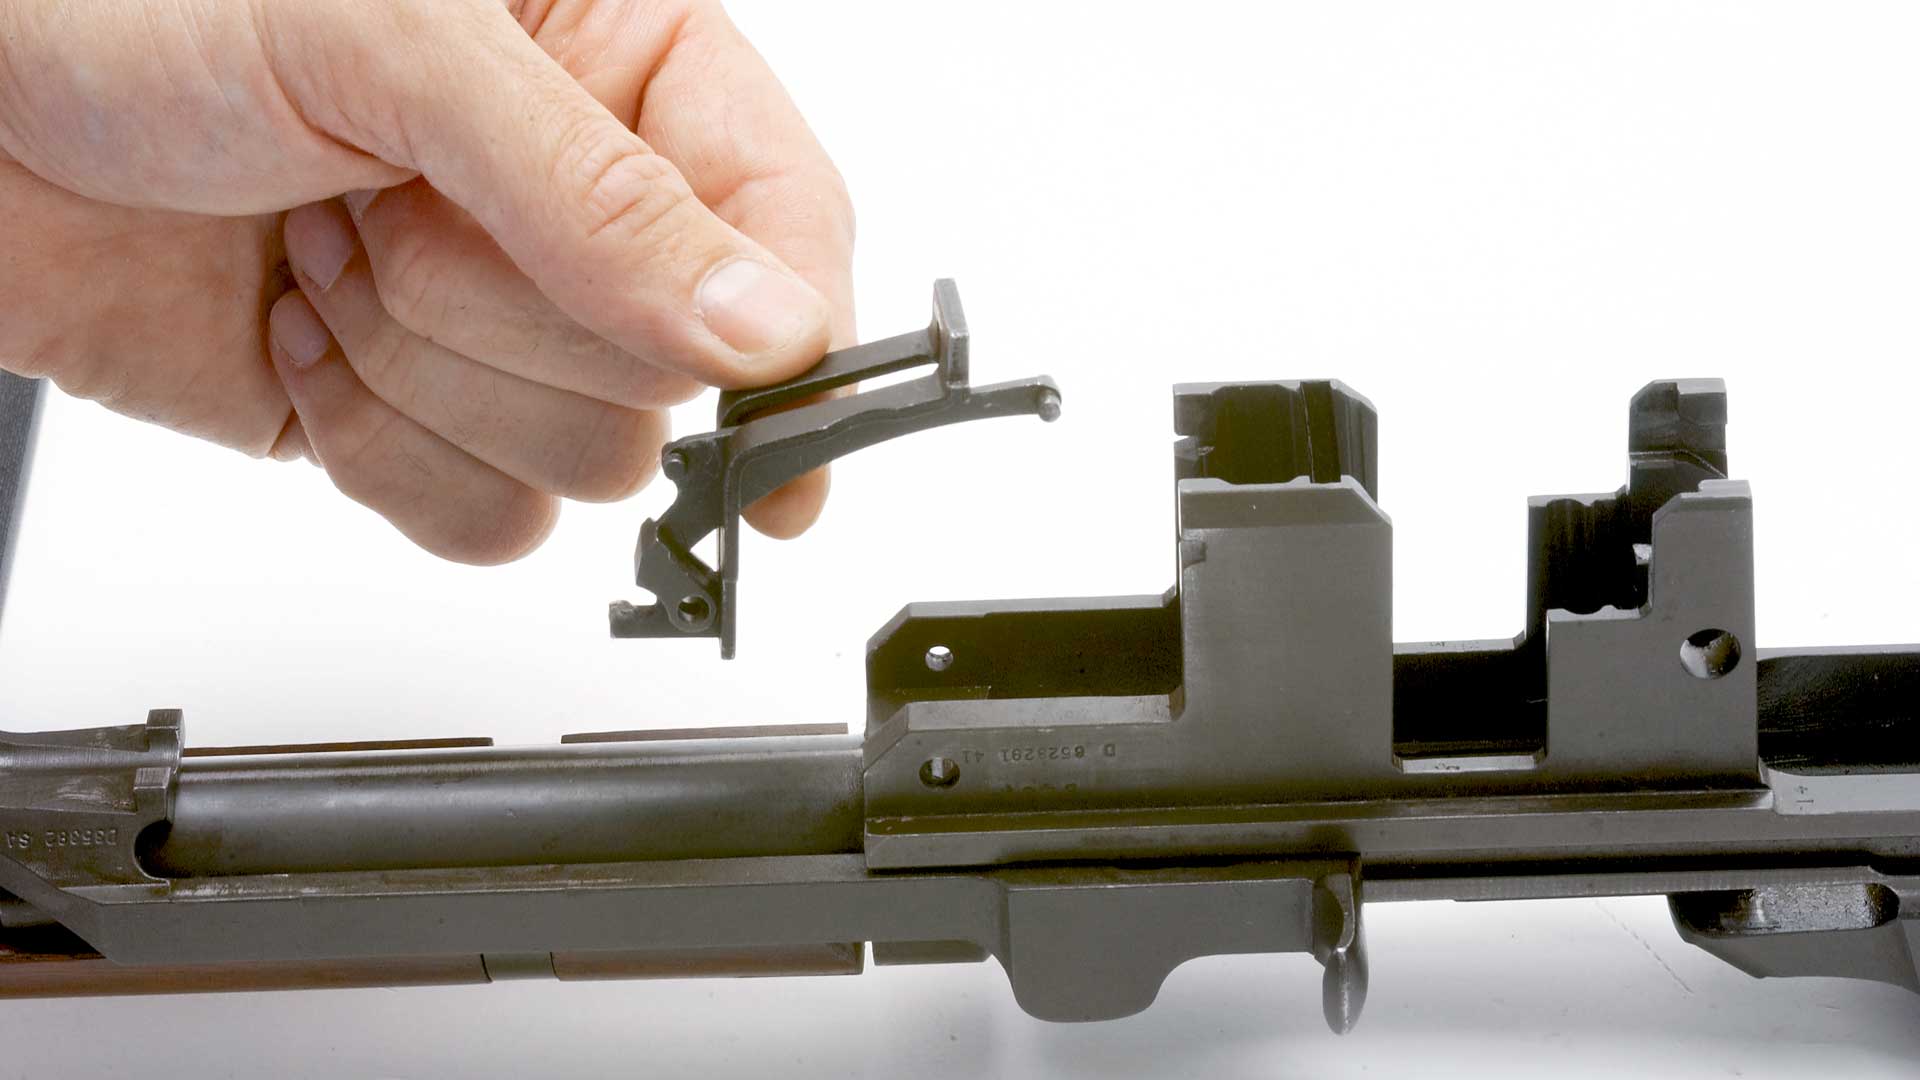
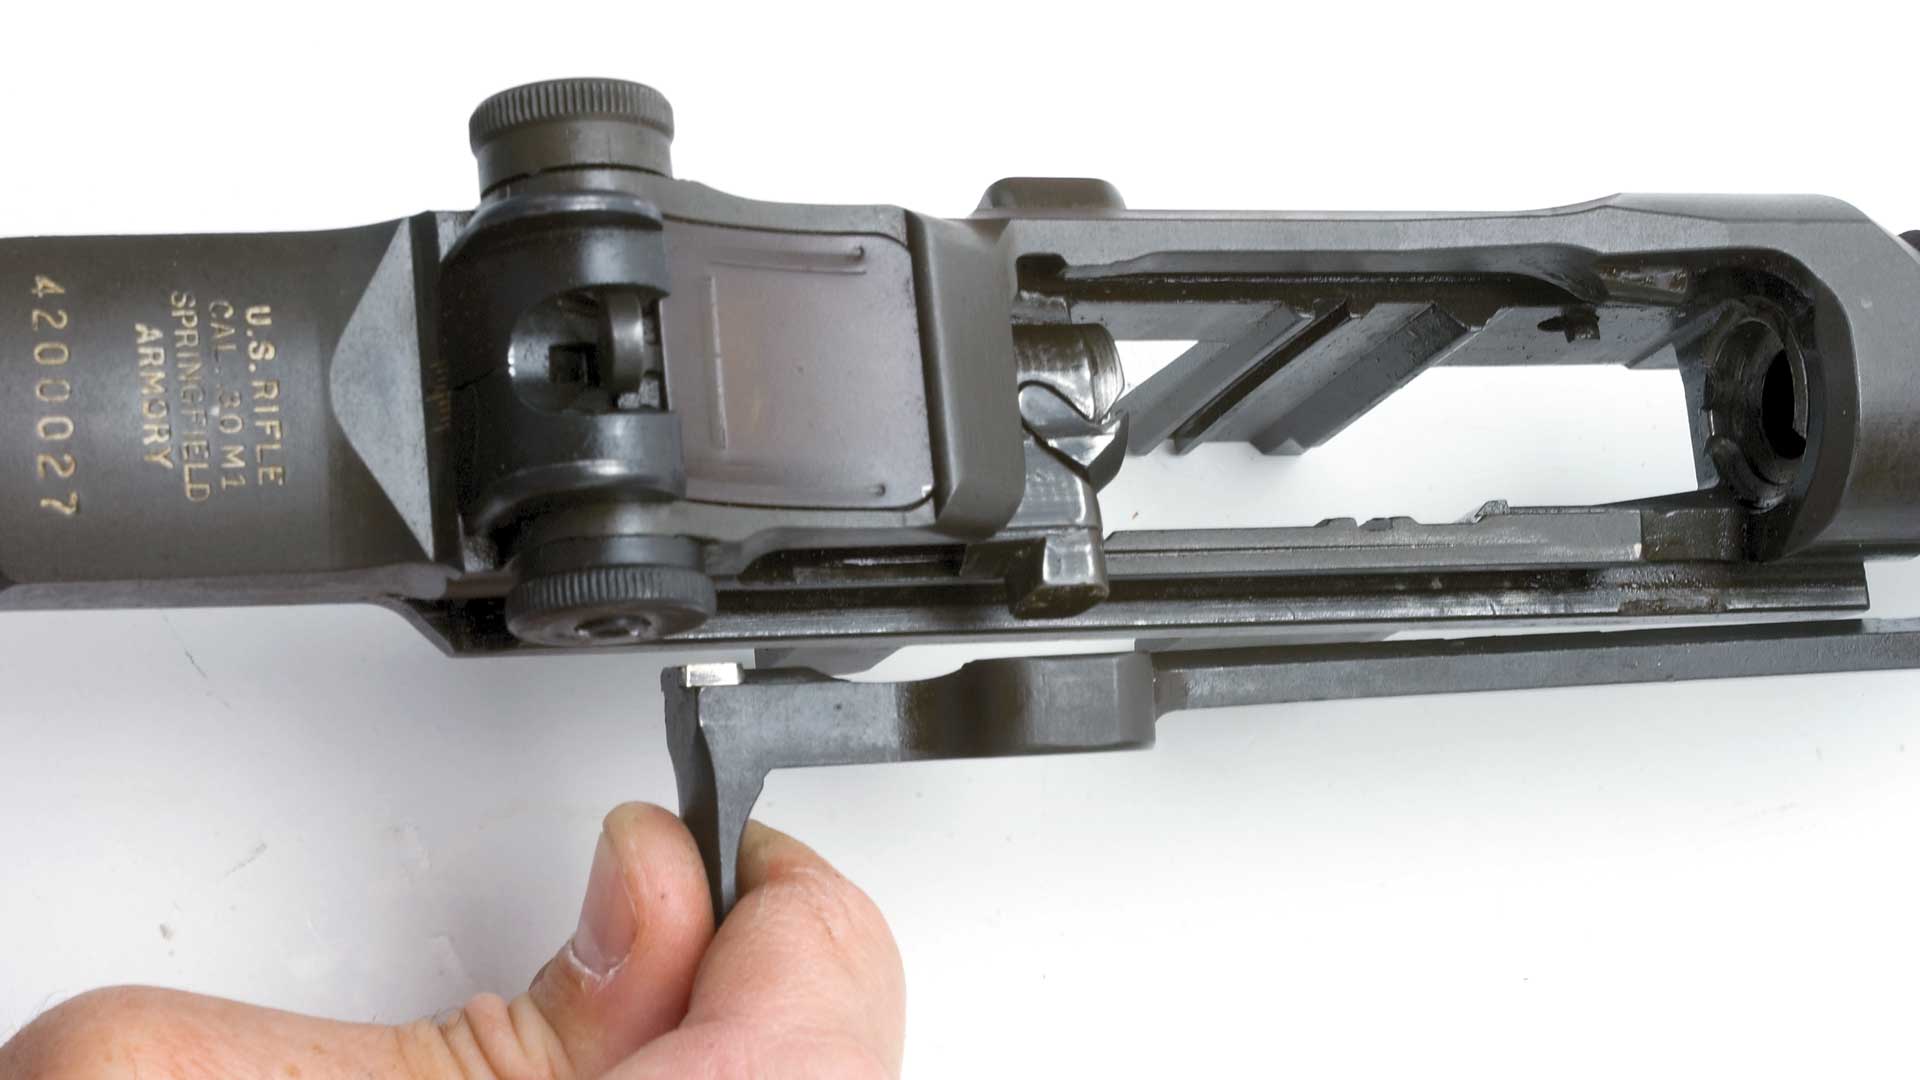
Continue disassembly by pulling the operating rod (38) rearward until the rear surface of the handle is directly under the forward edge of the windage knob on the rear sight. Disengage the guide lug on the operating rod through the dismount notch on the receiver with upward and outward pressure on the handle of the operating rod (Fig. 3). The rod should now come free from the receiver. Remove the bolt (4) by grasping it and sliding it forward while lifting upward and outward with a rotating motion (Fig. 4).
With a large, blunt screwdriver, unscrew and remove the gas cylinder lock screw (30). Unscrew and remove the gas cylinder lock (29). Next, remove the gas cylinder (28) by sliding it forward and off the barrel. If the gas cylinder is tightly attached, rap on the bayonet stud with a nylon hammer or piece of soft wood to loosen it. Do not burr or damage the internal splines. The front handguard (23) may then be moved forward and off the barrel.
This is all that is needed for basic cleaning. All other bolt and trigger housing disassembly and parts replacement should be done by a competent gunsmith. Reassembly of the M1 is in the reverse order.
A few precautions: The operating rod for the M1 has a bend that is intentional, and it should never be hammered on or straightened out. The crown of the operating rod should also be kept bright by using a solvent and nylon brush. Do not scrub with a metal brush or other harsh abrasive. The tolerances within the gas operating system are quite close and nothing should be used that can affect the system.
All operating parts should have a light coat of lubrication except the inside of the gas cylinder. This should be free of carbon deposits and other fouling, but should be kept dry
By far the favorite in the gun safe and the main armament for SHTF until the canoe capsized. Built just after D-Day by Springfield Armory, it still had the original barrel dated 8-44. As far as I can tell only the hammer and front handguard were replaced. The hammer was an IHC, that I changed to a correct S-A. I also artificially darkened the handguard to match the rest of the stock. Battle zeroed at 250 yards that old girl was flawless. I really miss her. 😏
ReplyDeleteHey Glypo,
DeleteThe Garand would have been my "Go to" in case the SHTF, I believe that it will raise havoc with body armor that will stop the lighter calibers, plus the bayonet at the end ;) but alas.....Durn canoe er I mean Kayak.
Good reminder and they DO need to be cleaned and lubed periodically, even if they are sitting in the safe most of the time!
ReplyDeleteHey Old NFO;
DeleteBefore I lost my rifles crossing that lake, I would take them out occasionally while watching a WWII movie or something and clean, and rod a couple of my rifles, great way to pass the time.
Thanks for the post MrGarabaldi. This is great info for the old hand and novice alike. I have one question. Do you have any tips on where good 150 grain non-corrosive can be found at an affordable price?
ReplyDeleteHey Jeffrey;
DeleteI would get my ammo from "Academy", the Monarch 150 grain shoots really well, it is actually made by "Privi Partisan" a Serbian company and unlike Tula, their quality is consistent and it is pretty good.
Thanks. I'll have to check out Academy "for a friend".
ReplyDeleteRe: "The M1 rifle is not without faults. At just under 10 lbs. it is heavy and the en-bloc clip does not allow for easy 'topping off.'"
ReplyDeleteGreat feature, but permit me to observe that the en-bloc clip can in fact be topped-off, and it isn't difficult once one knows how. There is a video on You Tube entitled, "How to Load the M-1 Garand the U.S. Army Way," taught by a man who learned the methods from his father, a WWII combat veteran who had used an M-1 in battle.
Included in the video is the proper method for the typical RH user to load the rifle, namely by using the edge of the right hand to hold back the bolt while your RH thumb and if necessary the left hand assisting. Once the clip is properly seated, the RH comes off the bolt handle, and can allow the bolt to go into battery and assist it in doing so.... thus preventing the famous and painful "Garand Thumb" so many novices get.
An empty or partially-empty clip can be reloaded - "topped off" - right in the rifle, using the same technique of the RH edge to hold back the bolt as before, while you insert the number of cartridges desired. Once done, press the clip into place and allow the bolt to go into battery, just as before.
One final tip: Any Garand with a functioning gas system can be turned into a de facto single-shot bolt-action by unscrewing the gas plug. After each shot the action will have to be worked by hand, to eject the spent case and chamber a fresh cartridge. This saves reloaders and others who collect their brass from having to police it up from ten feet away or whatever. Once you want self-loading action, just screw the gas plug back in as before and operate as normal.
Far as the Garand's faults are concerned, arguably the biggest was the fact that it was top-loaded and used top-eject also. This made scoping the rifle difficult using a traditional above-the-receiver position. Either a scout-style forward-mounted optic could be used, or the scope could be mounted in an off-set fashion to the left of the receiver, as seen in the M-1C and D sniper models.
Although unorthodox in appearance, Garand "sniper" models worked well in combat. U.S. Marine Staff Sergeant John Boitnott and his spotter used an M-1C to take out enemy soldiers during the Korean War at ranges of up to 1250 yards. Impressive work considering he never used a scope of more than 4x power magnification.
Second the comment of another reader concerning PPU/Prvi Partisan ammunition - the Serbian firm - they make extremely high-quality ammunition for the money they charge, and that includes a load designed specifically for vintage M-1 rifles....
Hey Georgia Boy;
DeleteTHat was me recommending the PPU/Privi ammo(Monarch) from academy, it is good ammo and thank you for your long writeup on the extra stuff on the Garand.
Those canoes and kayaks should be "weapons of mass destruction" for all the firearm losses attributed (rightly) to them!
ReplyDeleteHey .45ACP,
DeleteThe Horror, the Horror, LOL